
Creating a project
A project is the top-level container for a translation effort. It holds your files, your team and their roles, your settings, and the quality signals Aquilla tracks (validation, health and decay, built-in checks).
Create a project
Section titled “Create a project”From your organization’s Projects page, choose New Project. To start from a LangQuest language instead, see Importing from LangQuest below. Otherwise you’ll set:
- Project title: what your team will recognise it by.
- Source Language: the language you’re translating from. As you type, Aquilla suggests matches from the full ISO 639-3 catalog (about 7,900 languages), listing names or codes that start with what you typed first; pick one or keep typing to save any label you like exactly as typed. Plain names and refinements both work: English, Grade 7 English, es-419. The same suggestions appear on every language field in the app, including source and target language in Project Settings and the add-language field in Settings → General → Languages.
- Target Language(s): the language or languages you’re translating into. The first one you enter becomes the project’s primary target language, its default lane. “Lane” is Aquilla’s word for each target-language track within a project; see the glossary. You can add more target languages later in Settings → General → Languages, and each one becomes its own lane. The lane switcher in the editor lists them, even when the project has only one, so your team can move between lanes or add another. See Files, cells & navigation.
At the top of the dialog, Create in sets where the project lives. It lists every place you may create one: Personal, plus each organization where you are a Maintainer or above, or lead a team. It starts on the organization whose page you opened the dialog from, if you can create there. If you can’t, a note tells you, for example “You can’t create projects in {org}. You can create one in Personal.”
When the place you chose has teams you can create into, a Teams field appears (“Choose teams”; search with “Search teams”). Projects you create are attached to the teams you pick, at the Viewer role. In an organization where you are below Maintainer, picking a team is required: “Pick a team you lead. The project will belong to that team.” Once created, a message confirms “Created {name} in {destination}”.
Under Advanced: project shape, choose the project’s shape:
- Self Contained (Default): owns both its source and its target text. The dialog also asks whether you want to import a Cloned copy of another project, a one-time snapshot that then stays independent; choose that project in the Upstream project select: open it, then type to search (the box reads “Search projects…”).
- Linked Target: reads its source text from another project. If you’re adding a sibling language for a source you already have in Aquilla, the dialog suggests adding it as a target lane on that project instead, so there’s no separate project to keep in sync. Linked targets are the recommended shape for translation chains, where you’re translating from another project’s translations rather than its original source. Choose the project to read from in the Upstream project select (open it and type to search). See Source projects & linked targets.
Once you choose an upstream project, Files to bring in lists its source files, all checked. Uncheck any you don’t want; the dialog shows how many files will come in. For a linked project, leaving every file checked means the new project follows the whole source project, so files it gains later arrive too. Unchecking any file pins the link to the files you picked. A Cloned copy takes your picked files once and does not follow afterwards. You must pick at least one file. See Choosing which files a link follows.
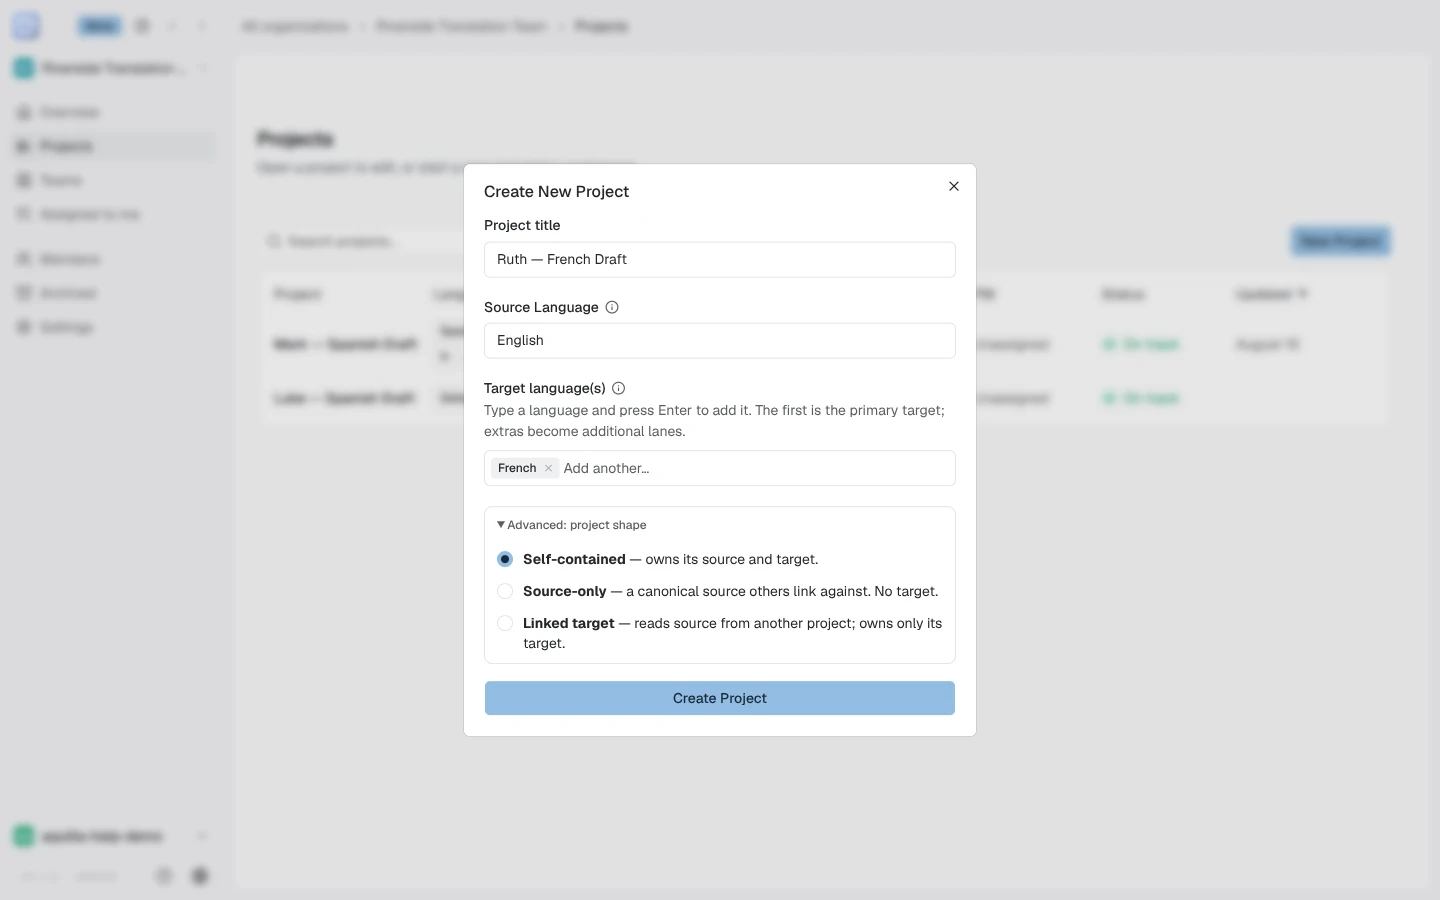
While the project is being created, the dialog locks: its fields stop responding, and the X, Escape, and a click outside do nothing until the request finishes.
Once created, the project appears in your organization’s project list with its translated, validated, and audio progress and a last-updated time (see Project health). You can rename it later from Project Settings → General, if you have Maintainer access or above.
Adding text
Section titled “Adding text”A fresh project starts empty. You add the text you’re translating by:
- importing: choose Import in the workspace header (or the empty project’s Import a file button) and pick how to bring text in: upload files (USFM, DOC/DOCX, PowerPoint, Markdown, TXT, EPUB, subtitles, spreadsheets, XLIFF, TMX, JSON/ARB, a zip archive, audio/video, or a Paratext project), pick files or a whole folder straight from Google Drive, pull an openly-licensed translation straight from the eBible Corpus or the Bible API, or use one of the specialized importers; or
- linking a source project, so the source text flows in from a shared upstream project.
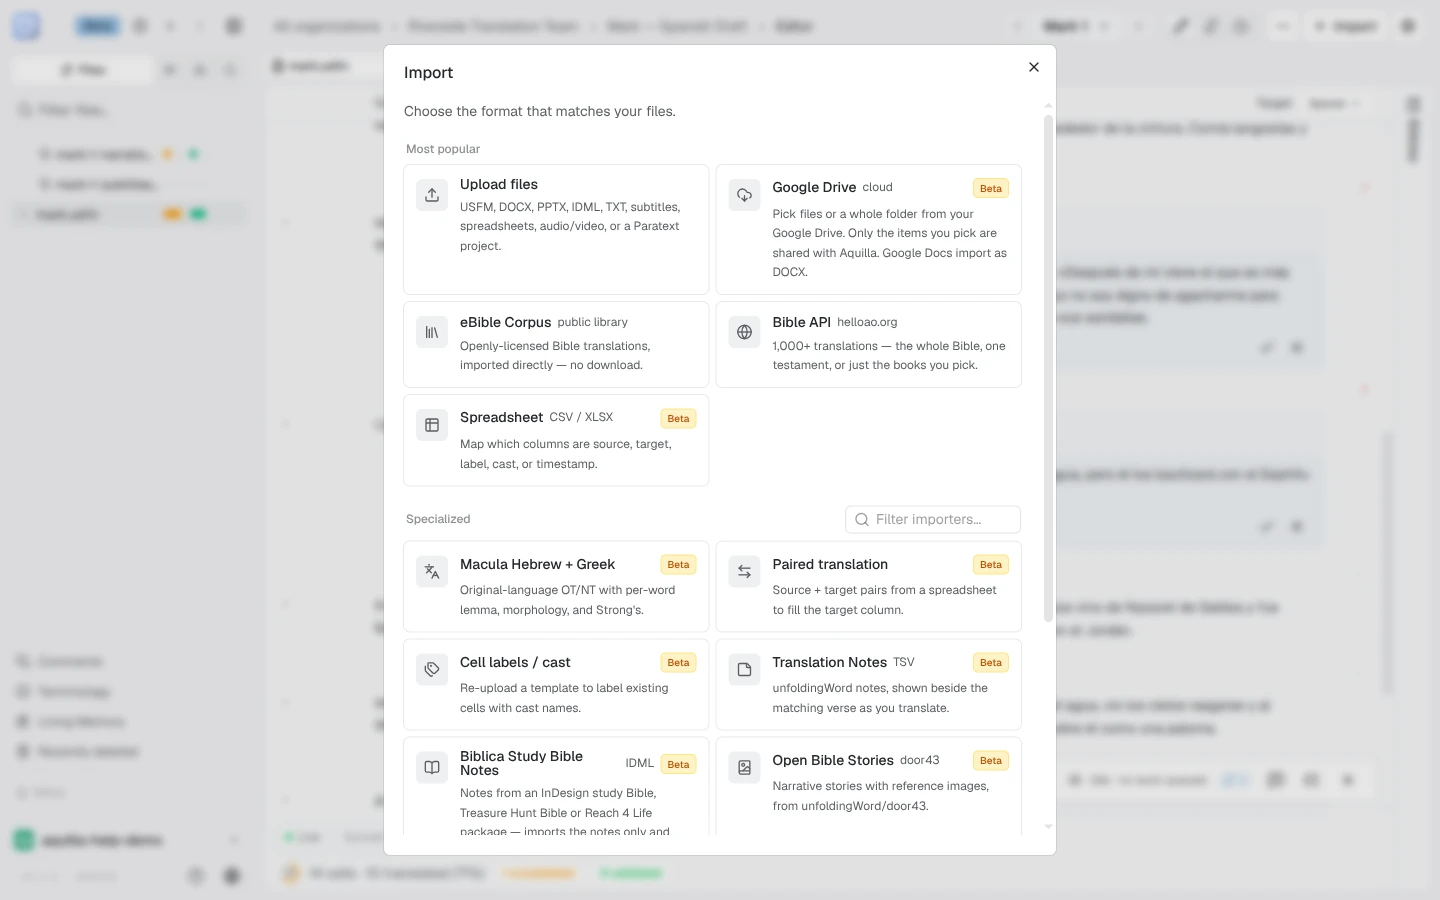
One of the specialized importers, Biblica Study Bible Notes (beta),
brings in a study Bible’s notes from an InDesign (.idml) export as
translatable text, tagged with the book and chapter they belong to. A book
volume also brings in its Bible text, one cell per verse keyed to that verse’s
reference, next to the notes; front and back matter volumes have no scripture
and import notes only. Notes come in as whole
paragraphs by default; the import panel offers an option to split long
notes into one cell per sentence instead. The same panel also has
checkboxes for two related editions with their own note structure: This
is a Treasure Hunt Bible file and This is a Reach 4 Life file, each
matched to its own .idml export.
Importing an EPUB shows a Chapters in this book checklist on the preview screen before anything is added: each entry in the book (Chapter, Table of contents, Cover, Notes, or No text) has its own checkbox, ticked for actual chapters and cleared for the rest, so you can leave out the cover and front matter and bring in only the text you want translated.
Google Drive (beta) lets you pick documents, or a whole folder, straight from your Drive without downloading them first: only the items you pick are shared with Aquilla, and a native Google Doc comes in as a DOCX. Before anything downloads you’ll see a summary of what will import and, separately, what has to be skipped and why, for example a Google Sheet (“Google Sheets aren’t supported yet, download as .xlsx and upload it instead”) or a Google Slides deck. A single Drive import is capped at 500 files.
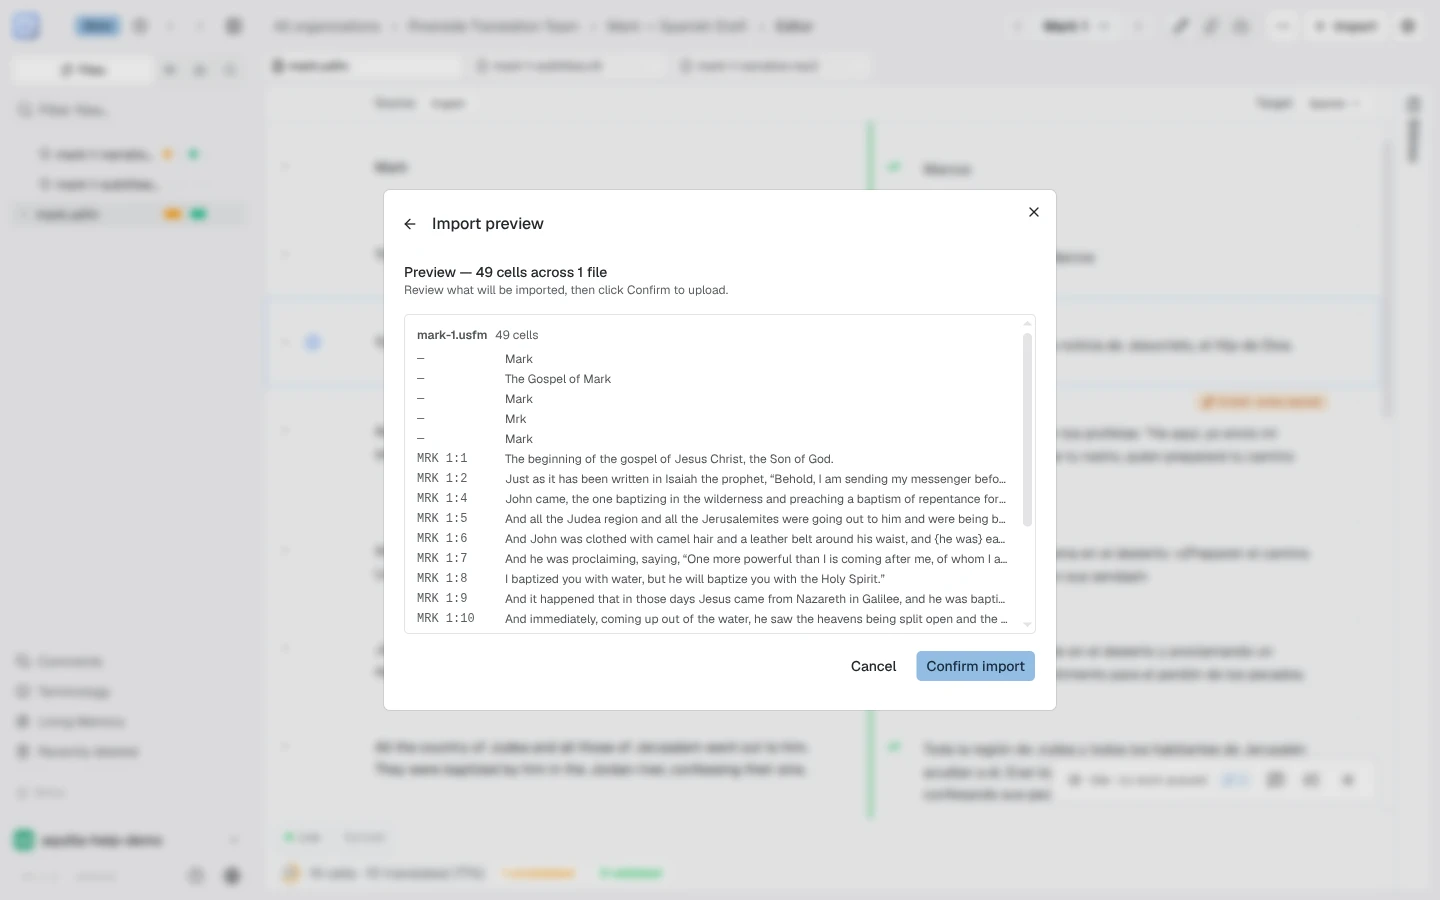
Whatever you pick, Aquilla shows a preview of the cells it found before anything lands in the project; confirm it and the file appears in the sidebar, ready to translate.
If you’re moving an existing project over from Codex instead, see Migrating from Codex.
Import translations into a file
Section titled “Import translations into a file”Already have translations for a file (from a partner team, a previous tool, or a spreadsheet)? Choose Import, then A translation, and pick the file it translates. Upload a USFM file, a spreadsheet (CSV, TSV, or XLSX), or a subtitle file and Aquilla matches each row to a cell, shows you the matches to review, and only overwrites an existing translation if you tick it explicitly. Confirmed rows appear in the editor immediately and sync in the background.
This is different from importing source text above: it never creates or changes source cells, only fills in translations for cells that already exist. To have someone check the translations first, tick Stage as proposals for review: nothing is written until someone approves it.
Importing from LangQuest
Section titled “Importing from LangQuest”LangQuest is a separate oral Bible translation app. A project can follow one LangQuest language: its passages and recordings come into Aquilla and stay up to date. In the Create New Project dialog, choose Import from LangQuest (“Follow a LangQuest language. Its recordings come in and stay up to date.”), the first button in the dialog.
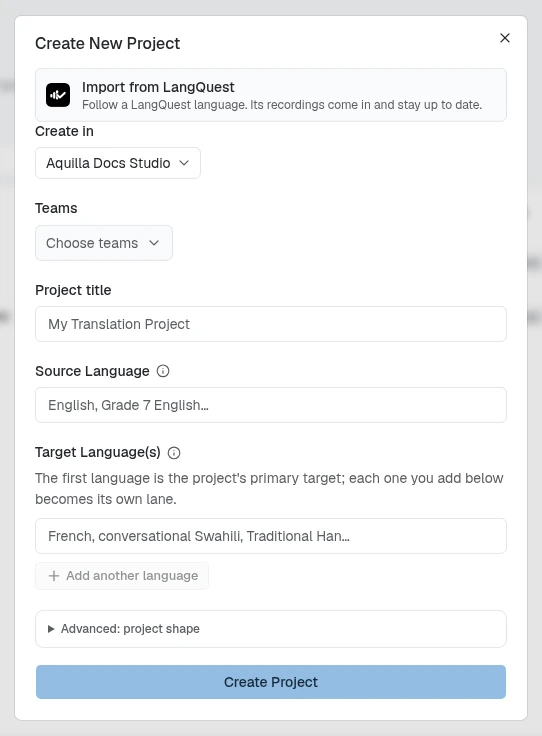
- Choose where the project lives under Create in, and its teams if asked, the same as for any new project.
- Make a token on LangQuest’s Connect page (Open LangQuest Connect takes
you there), paste it into LangQuest access token, and choose Check
token. Aquilla keeps the token on its server and never shows it again.
A token that doesn’t start with
lqp_, or that LangQuest refuses, is turned down with the reason. - Aquilla shows which LangQuest organization the token is for and when it expires. Under Language to follow, pick a language. A language the token can’t read is listed as “(no access)” and can’t be picked.
- What this token lets Aquilla do sums up the token’s access (such as Read only or Approved recordings only) and lists what each scope allows, such as “Import every version shared for review, and keep it up to date” or “Import approved versions only, and keep them up to date”. A scope the token lacks names the scope to tick on LangQuest. Scopes Aquilla doesn’t use yet say so.
- Project name starts as the language’s name. Choose Create and import.
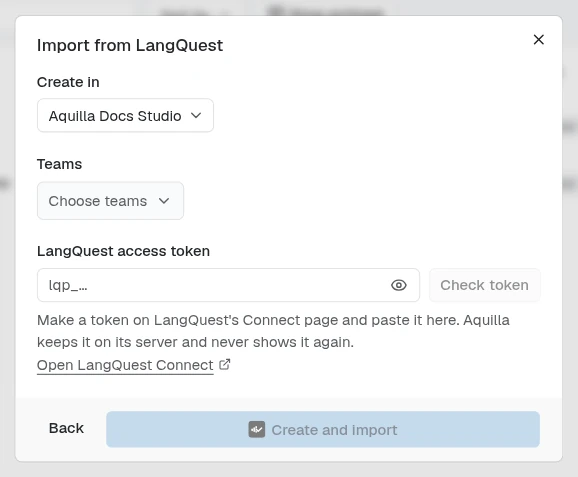
The new project’s target lane is named after the LangQuest language, and a message confirms “{name} is linked to LangQuest. Its recordings are importing now.”
Keeping it in sync
Section titled “Keeping it in sync”A linked project shows a LangQuest · {language} badge in the project workspace header and on the project overview. Click it to open Linked to LangQuest, which shows when it last synced and offers Sync now.
- Syncing needs Project lead access or above; anyone else reads “Project leads can sync this project.” The first import, and later updates, run when a project lead or above opens the project, and again when they come back to it after a couple of minutes away.
- A Maintainer or above also gets Publish approved versions, to report approved versions live on a channel with Mark live or Take down. This needs a token with LangQuest’s Release scope; without it the panel says “To publish from Aquilla, make a token with the Release scope.”
- If LangQuest stops accepting the token, the panel says so, and a maintainer can paste a new one and Save token.
- A maintainer can Unlink, which asks first: “Stop following LangQuest? Imported passages and recordings stay in this project, and the token is revoked at LangQuest.”
Inviting your team
Section titled “Inviting your team”A project is more useful with people in it. Share an invite link to bring in translators, reviewers, or viewers; each link carries the role you choose. See Inviting people and Roles & permissions.
Help assistant
AI answers from the Aquilla docs — may make mistakes.